Col & Marj Drewitt
"Trains for the Garden"
ABN 95 566 865 338
8-10 Henderson Hill Rd,
Silvan Vic 3795
Business Mobile 0419 504432 BH
Email:
admin@trainsforthegarden.com
Laying Code 332 Flexible AusRail and
Sleeper Bed.
Things to Consider in Planning your
Layout.
In planning
a garden layout, selecting a site needs to be done
with a degree of care, especially with consideration
to the wife. As the old saying goes “Happy wife,
happy life”. That done, work out where the track is
to be laid. Take care to allow for obstacles such as
trees and bushes that you want to keep as part of
the landscape.
Pointers on Assembling the Rail and
Sleeper Bed
When handling the lengths of
brass rail take care not to twist them. When
assembling Flex Track, the brass rail should be slid
into the PVC ties on the sleeper bed. Both rails
should be done in unison pushing the first sleeper
bed into the centre of the two rails. Then proceed
to slide the rest of the sleepers to the centre from
either end of the pair of rails. It is possible to
do this, while watching TV!
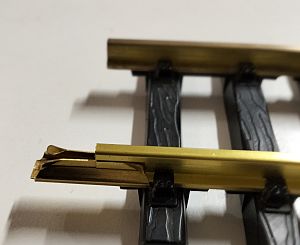
Once you have assembled your two
rails and sleeper bed, it’s time to fit the rail
joiner onto the rail. Facing the end of the rail,
the lug on the bottom of the rail joiner must be
fitted into the slot on the sleeper bed on the
right-hand rail Fig 2. This is essential if you
intend to use Lgb or Piko ‘set track’ or points.
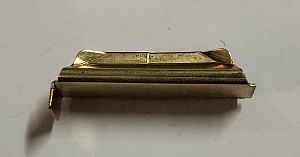
Piko brass rail joiners are the
best Fig 1. These joiners have a half way indicator
mark on the edge of the joiner and a down facing
lug, on one end of the bottom of the joiner. The lug
is designed to fit to snugly slip into the sleeper
bed and will prevent the joiner from slipping down
the rail.
If you are using track power, you will
need to smear a very small amount of either Massoth
or Piko graphite paste on the inside of the rail
joiner, before you attempt to connect the rail
joiner to the brass rail. This will assist
conductivity through the joiner to the rails.
Fig
1
Creating a Length of Straight
Track
If you are creating a straight length of
track, the rail joiner is fitted by pulling the end
sleeper bed off the rail, just enough to reveal the
slot under the rail tie, in the end sleeper bed Fig
2. However, before you do this, use a flat file to
remove any burrs on the end of the rail and the rail
flange. Slip the rail joiner lug into the sleeper
bed slot Fig 3. Then push the rail joiner back
onto the rail. The joiner will be tight; with a
light hammer gently tap the joiner into rail to the
halfway point on the Piko joiner Fig 1. The end
result is shown in Fig. 5. Repeat this process on
the opposite end of the other rail. When finished, you will have a
rigid section of straight track.
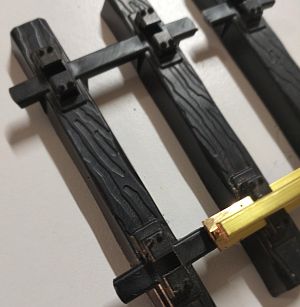
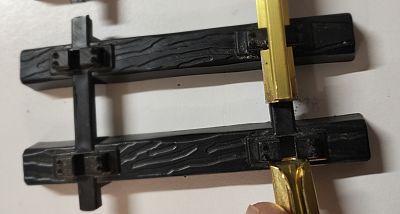
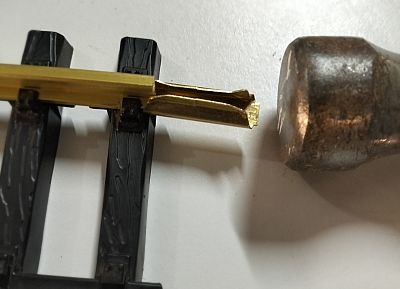
Fig 5.
The use of Rail Clamps
In addition
to the use of Rail Joiners, Piko track clamps may be
used as an alternative. These are sold in a pack of
10 together with a tool used to open the clamp,
simply slide it into the rail to the half way point
of the clamp and re-tighten it. These are time saver
to say the least. Massoth track clamps are also available
and can be used with ease in laying AusRail or Lgb
brass rail.
Laying the
Track Sections in the Layout
When you
have decided on your rail plan, and where your track
is going, and have
completed your bridge work and cuttings etc. and purchased
your Rail and Joiners; then it’s time the lay the
track.
There are
several methods of laying the track. The track needs
to be fastened down either to concrete pavers, or a
slab, or timber pegs driven into the ground. Cypress
is best, because it is rot resistant and the grain
in the timber does not split easily. We suggest
40x20mmx250mm timber pegs pointed at one end. Drive
them into the ground with a small sledge hammer at
about 40-50cms apart. Make sure the tops of the pegs
are level. Also remember that one of the sleepers
must correspond with the centre of the top of the
peg so that the track can be screwed down.
When placing the timber pegs into the
ground, the first peg should be close to the
starting end of the flex track. There should also be
a ground peg at the opposite end.

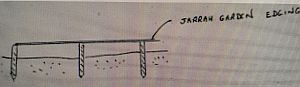
A better finish is achieved by screwing a
timber ‘deck’ onto the tops of the pegs. And then
screwing the rails to the ‘deck’ such as garden
edging. This requires considerably more effort but
the end result is a better finish.
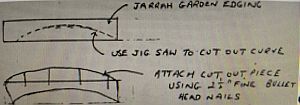
Straight runs are easy. It gets a little
tricky when you create a curve. However, this can be
achieved by cutting the inside edge of the garden
edging with a Jig-Saw and simply using the off cut,
attaching it to the strait on the opposite side of
the edging, with fine 45mm bullet head nails. You
will need to pre-drill the garden edging to prevent
it from splitting.
The other alternative is to simply screw
the rail to the tops of the timber stakes taking
care to keep the rail surface level.
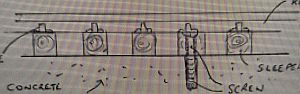
Using
Concrete Pavers as an Alternative
The best way
to fasten the track to concrete or a concrete paver
is to use orange “spaghetti” from a hardware shop.
You would need to pre-drill a pilot hole through the
sleeper bed, and mark the concrete below the
sleeper. Then, using a 4mm masonry drill bit, drill
a hole in the pre-marked spot on the concrete, to a
depth of say 25mm.
If you intend to use Points,
(Switches or Turnouts as they are often called); it
is always best to start laying your flexible track
away from the Points rather than attempting to
insert them later.
And when laying the Points or any
other specialty track accessories, never use
screws or any means of fixing these items in
place. Always do all the screwing and fixing
directly on the lengths of Flex-track either side of
the points or specialty track items. The-Flex track
will hold the points in position.
And when fixing down the Flex-Track
lengths you will only need to use three or four
screws. It is advisable to screw the second last
sleeper at each end of the length of AusRail and one
or two in the centre.

It is best to lay one section of
track at the time placing enough timber pegs for one
1800mm section of flex track screwing it down before
laying the next section of track. The flex track can
be drawn easily into a curve without the need
for a rail bender.
When each section of track is laid,
remember that the rail should be totally butted up
to the previously laid section. Do not attempt to
leave ‘expansion’ gaps.
Creating a
Curved Track.
This is a little bit trickier.
Once you have decided the radius of your curve,
Begin the procedure as you did with assembling the
straight track. Join this to your previous length
track, making sure the rails are pushed well into
the joiners of the previously laid track. One full
length of AusRail track is very flexible and can be
pulled into a desired curve no less than the
equivalent of a 5’ circle. Naturally the inner rail
will grow longer, and need to be cut square with the
outer rail using a hacksaw. BUT NOT YET!
When you have screwed it down and
before you cut the rail, stand
back and see how it looks from the distance.
(Sometimes by unscrewing the screws in the middle
section of rail allows to rail to spring out into a
more natural curve).
When you are satisfied with the
look, the excess rail on the inside of the curve,
can them be cut square with the outer rail. Then use
a flat file to remove the brass burrs off the end of
the rail and the top of the bottom flange.
Facing the end of the rail, the lug on the bottom of the
rail joiner must be fitted into the slot on the
sleeper bed on the right-hand rail. It will also
require the use of a hammer to tap the tight joiner
into rail, to the halfway point. However, because
the rail has been curved, it may also be necessary
to grip the rail with a pair of pincers in the
process of fitting the rail joiner.
To secure the curve you also may
need to use extra screws to hold the curve in place;
and again, screwing down the second sleeper at each
end of the track and two or three in the middle
section.
When the
rail is laid and the job completed, back-fill the
track using bluestone
quarter
minus screenings as ballast to the level of
the sleeper bed. You will also need to remove any
small stones that may be caught up in the rail
ties on the sleeper bed.
Before you
attempt to do test run with a locomotive, make
sure the top of the rail is thoroughly wiped and
cleaned of dust and grit. And don't hesitate to contact us
if you are experiencing any difficulties.
Tools to have
at Hand when Laying G Gauge Track.
1.
Small hand-held sledge hammer and a light
builder’s hammer.
2.
Good quality hack saw and spare blades,
suitable for cutting brass.
3.
Flat File for filing burs off brass rail.
4.
Stanley knife for trimming of excess
sleepers.
5.
Pair of bent long nose pliers for
gripping the rail pushing and pushing it into the
previous joiner.
6.
Set of drill bits including a 5mm masonry bit
if screwing the track to concrete or pavers.
7.
Cordless drill.
8.
Small hand saw.
9.
Tape measure.
10.
Set Square.
11.
Pencil.
11.
A roll of Orange spaghetti plugs and a pack
or two of 30mm bugle screws.
12.
For track power, a tube of Graphite Paste, to
be used sparingly in the rail joiners to aid conductivity.
Please note, these instructions are
a general guide only.
Don’t hesitate to contact me
by email if you are having trouble
interpreting any of the
information provided.
Col Drewitt